Showing posts with label kids projects. Show all posts

Monday, December 05, 2011

'tis the season.


These dark cloudy wet days are perfect for cozying up at home and making things. We have been busy counting down to Solstice, making gifts and decorating. Some traditional things we do every year, some inspired by bloggy friends. All making the house a warm beautiful place to be. 'Tis the season!

Friday, November 11, 2011

clay gift tags.


The gift making craftiness has begun. It is time for list making, gathering supplies, and making. The boys love making things too. One of the things we started this week is gift tags. We change it up from year to year, and this year decided to make some using air dry clay. It is a really simple process and the variations and possibilities are really endless.


For this first round we rolled out air dry clay fairly thinly and G picked out some stamps. Using a napkin ring (it was the perfect size we needed - you can also use cookie cutters of any shape you like) we cut out circles.


G then took a skewer and pierced a hole in the top of each one. He then stamped them. He did one batch that he stamped "a gift for you" and he added some little embellishments with other stamps around the edge for texture. Stamp words, names, designs, whatever you want.


We let them dry for 2 days. The first day they dried stamp up. We then flipped them over to dry a bit on back too.


You can use them as is - the white clay looks nice. Or, you can paint. We wanted an earthy look to go with some of our tea blend gifts, so we squirt a dab of gold acrylic paint on each disc, made sure the paint was in the sunken stamped areas, and then gently brushed/rubbed with a sponge brush to remove most of the paint from the surface (don't forget the back and edges), leaving the low lying words filled with darker paint. G finished a few dozen happily painting and brushing. Let dry. They look earthy and beautiful and are great for hand made gifts.

You can insert ribbon, raffia or twine through the hole and tie onto your gift. You can leave more generic or you can use the back of the disc to write a name (a paint pen works great). We are planning on making a few more batches of them since they look so nice - some that are long and skinny with stamped names going down the front, as well as a few other shapes/variations with stamps (snowflake, leaf, star). Love it!

Monday, October 17, 2011

glow stick lanterns.


With the dark arriving earlier and earlier, the boys are often out playing with the neighbors as it gets dark. They play tag and ghost in the graveyard. We walk around the block to see what spooky decorations are turned on. And we play with glow sticks.

We've been wanting to crack some open after being reminded by Tara. We gathered a few of the larger glow sticks, canning jars, strong scissors and water. We cracked and shook, and then cut off the top and poured the liquid into the canning jars (using a fine strainer keeps the little broken bits out of your jars). You can keep single colors or mix and see what you get. If you add a little bit of water you get a bit better glow.

Screw the lids on tight and shake! The canning jar glows so much (for hours, depending on your glow sticks) - very cool and lots of fun.


If you get some on your fingers just wash with soap. Or, run around in the dark waving your hands in the air and moaning like a ghost to get a few awesome shrieks. Ahem. Although non-toxic the liquid can have little shards in it from cracking the tube to activate, so you don't want to play in the liquid - keep it in the jar. When you are done you can just wash the jars with hot soapy water.

Thursday, October 13, 2011

ghost lanterns.


As the rainy fall days surround us, we think of light. More light! It has been awhile since we have made any canning jar tissue paper lanterns, so today in the spirit of G's holiday decorating mission we made ghosts. These are always fun and easy to make and you can pretty much find a design for any holiday or season (here is a good tutorial with Halloween designs if you want more than my laid back general info!).


G and I cut strips of white tissue paper, pulled out brushes, put out craft mats, and poured Mod Podge into bowls. Working a strip at a time the boys then brushed on Mod Podge, then applied a strip, gently tapping and coating each strip as they adhered.


They did two layers, leaving the tops loose until the end. They then added Mod Podge to the top edge and then sprinkled a good bit of white thick glitter all over the outside.


Must have glitter.


We trimmed the tops so no white paper was over the opening and let them dry. We did apply a single water based varnish layer with a brush after the modpodge dried. If you don't use glitter you won't need it, but we didn't want to shed glitter forever (there are now versions of all-in-one Mod Podge glue/sealer/finish that glow in the dark, shimmer and have glitter, but ours was...plain).


When dry G helped draw face designs and I cut them out. He glued them on with a thick glue stick layer. All that was left was inserting a tea light and turning out the lights!

Wednesday, October 12, 2011

apple candles.


G asked the other day when we were going to make the apple candles. It is fall, after all, and we have been stopping at the orchard every week for a month! Which means of course we immediately went to gather the supplies and make some.


We found a few apples that were not the most perfect to eat. G first scraped out a little hole in the top. He used the apple corer to push an inch in and then popped that out and scooped with a spoon (a grapefruit spoon worked best, if you have one). His brother decided if there was apple gutting going on, he was making some too.


G scooped and fit, scooped and fit, until the hole was just big enough to hold a tea light (we had black amber tea lights). He slid those in.


From there, he wanted to decorate them, so he found some fall leaf craft 'buttons' and using fat topped sewing pins, he pierced the apple to secure. He also studded a ring around the top with cloves.


The final touches included cutting out some modeling wax in leaf and apple shapes to scatter around the holder.


Done! Apple candles will last only a few days, but they look and smell nice! It gets dark earlier and earlier, and G loves when they are lit in the evening.


Our house is feeling more fall festive by the day - although G says we have a lot to do still! :)

Monday, October 10, 2011

felt skull bunting/banner.


For the past week, G has been on a crafting extravaganza. We have made and baked and crafted and created. He loves that the holidays are upon us and we can FINALLY decorate the house for something! One of the first projects we did was a felt skull banner.

Supplies:: 2 pieces of 8.5x11" orange felt, and 2 pieces of 8.5x11" dark brown felt (you can use black too, we just like brown/orange for Halloween). Bias tape or hem binding. Stapler (or sewing machine). Glitter glue. Craft glue. Scissors.

I cut one piece of the orange felt into quarters (fold in half, cut. fold both halves in half, cut).
Did the same for the brown. This makes 4 orange rectangles and 4 brown.


We had looked online for a skull I could cut out with scissors easily (and which G approved of), and found this one. I cut it out after printing a copy to the printer (printed larger/blown up to fit my felt rectangles). I used a chalk pattern pencil to outline it to the felt. I cut out 4 orange skulls and 4 brown skulls from the other 2 felt sheets.


G got to work laying out all of the felt pieces and gluing orange skulls to brown felt, and brown skulls to orange felt.


Once that was done, it was time to attach the felt bunting/banners to the bias tape (you could easily use a ribbon or hem tape too). I offered to sew it for an even stitch, but as he must do everything himself and already had to concede that I must do the skull cutting, he decided that stapling would be best. He carefully stapled each felt piece to the bias tape.


He then applied a glitter glue design to cover the staples.


After it dried for awhile it was ready to hang. We now have an awesome skull bunting/banner hanging in our window. He wants to make more! I have my scissors ready.

Monday, September 26, 2011

fun science at home.


Dark wet fall weekends are perfect for family home life. We cozy up, bake, make, read, play, and spend time together. Science is big in our house - there is always something on the to-do list, and there is always a basket filled with something or other we want to play around with. Sometimes we do bigger projects - program a robot, make a solar oven, look through the microscope for specific somethings, test water or soil, see what happens. But sometimes the small projects are really fun too. And they are fun to repeat and even if simple they never quiet get boring (at least with my boys).


One of those endlessly fun things is the cornstarch project. You mix water and corn starch and get a funky substance that is both a solid and a liquid. The thing is water and corn starch don't completely mix. Their molecules slither around each other. The corn starch molecules get tangled up, but the water molecules flow around them. So, if you whack the substance hard, the molecules don't have time to move and it feels like a solid. When you move into it slowly however, the water molecules have time to flow around and it is a liquid. It is messy. It is fun. And it is easy to do.

You might want to cover your table with something.
Pour 2 cups of corn starch into a bowl. Measure 1 cup of water and add a few drops of food coloring if you want. Stir. Slowly add the water mixture into the corn starch, stirring as you go. Mix it up - it should be really thick and hard to stir. If you can't stir at all add a little more water, but it should be a bit of a struggle.


Now, go! First try to hit the mixture with your knuckles quickly.


Next, gently press your fingers or hand into it.


Goo is a long time of fun.


Another easy and fun one is making a lemon battery - with your tongue as the final connection. Batteries of course are made with two metals and an acid. One metal has a positive charge, one a negative and the lemon is the acid. By sticking your tongue on it, you complete the circuit and get the tingle.

Take a lemon and push while you roll it on the counter to get it juicy inside. Straighten a paper clip and stick it in the lemon. Take a piece of copper wire about the same length as the paper clip and insert it into the lemon near the paper clip. Touch it to your tongue! You should feel it tingle.


We had zinc and copper plates from another science kit, so used those and got a bigger tingle. Whoo hoo! :) We could also test the current by connecting it to a little LED light.


Very fun. Perfect family fun for a dark rainy day.

Tuesday, January 18, 2011

robot battle arena.


We've had some lovely snow - which means a lot of snuggling down at home, and trips to the sledding hill. We've had a few fun things stashed away and the snow was the perfect excuse to pull them all out.


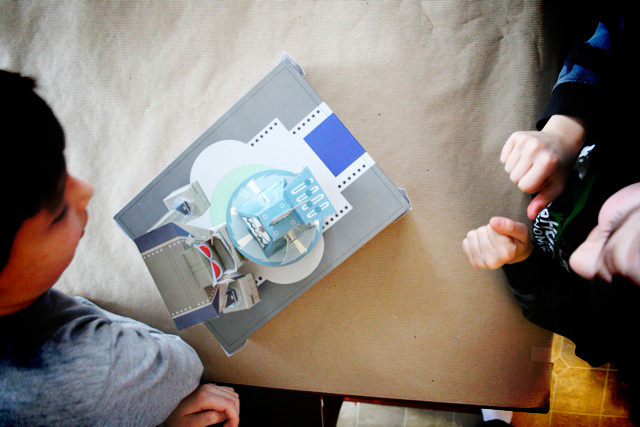
New card games and books, and a paper robot battle kit. Ooooh yeah. Robots are big in this house. Both real and toy robots. This kit has paper robots to assemble which are slipped onto a wind up 'motor' base on wheels and they move. A sensor of sorts makes them turn when they encounter an edge. There is a raised battle arena.


So on their own, the robots go in circles around the stage. When facing off, one must inevitably push the other off of the edge. Score! Yes, lots of little boy yelling and cheering goin' on.


The boys need a little bit of help with all of the scoring/gluing/folding, so to make whole thing out all week for full excitement, they want to assemble just one each per day.


I was waiting to see how long it would take them before they wanted to start modifying, changing, re-vamping, and altering designs and motors to suit their own ideas.


They have already started plotting. We have some interesting modifications ahead of us, and several more days of robot battles to say the least!


.